 |
The beautiful designs and personal touches that you add to wood surfaces can be the most satisfying ways of all to enhance the look and feel of quality in your projects. Here is your complete guide to the whole range of techniques for wood surface decoration. Now at last your work can meet the highest standards, even though your experience may be limited.
Hundreds of close-up charts and diagrams and clear, step-by-step instructions show how you can master intarsia and veneer, marquetry and parquetry (including oyster work, bandings and tunbridge ware), wood, metal and repetition inlay boullework and much more. Scores of photographs show you both museum-quality and elementary examples of each type of decoration-adding to an elegant, inspiring, but most of all practical handbook.
An extract from the book, discussing the technique of adding detail to work using sanding or engaving methods. |
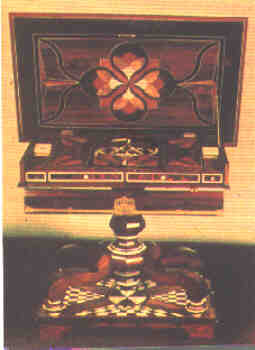 |
Strange as it may seem, animation work was always achieved with saw-and-sand shading until about 1760, when engraving of work began. The photograph shows the left-hand Panel of a table by Thomas Chippendale from about 1770, which has been engraved using the knife. The tiny harebells in the ovals are three individual Pieces of wood, each shaded and engraved; the engraving. on the acanthus is almost hesitant and weak. This is a very important surface since the engraving, apart from the restored areas, is a rare original. Compare this with the boldness of photo 4I a Work completed twelve years later. The engraving here is everything, and no shading is used. The reasons given for this change havebeen many; but in my opinion there is only one: speed. In fact, the next stage, pinworm, was not long in arriving. Black ink and a fine lining pen, used after the first coat of varnish, became the accepted practice; this allowed such fine detail that in a short time the basic simplicity of Marquetry brought about the decline of the art.
|
How to engrave Marquetry is up to the individual. My own favorite method is to mark the work with a pencil and then cut it with a knife. The use of woodcut engraving tools is difficult because of the size of work. Use a knife, or whatever is comfortable. A center cut, with a cut above 10 degrees to either side will, after practice, produce the desired effect; this can be enhanced with fillers. But I have found fillers are not necessary in most cases, and prefer the engravings to be filled during the process of polishing, unless of course colored fillers are desired and are used as part of the design.
|
These are the basic principles of Marquetry. The saw, being paramount in development, never seemed to decline in use on the Continent. The illustrations need no further words from me, except to say today one never sees these articles in their full and intended colour; age dulls the surface and they fade to a uniform gold. When you see a floral panel which has not been touched since it was made, it can be hard to believe that when new the panel was as colorful as nature. In my work of repair and restoration, complete panels of marquetry sometimes have to be moved. The reasons are many; worm, rot, or severe warping have often necessitated such a radical step. These old surfaces carry a useful secret in the glue line. Where the veneer joins the ground, the original colour can always be found. These colours were often the colours of nature; it is perhaps sad that photographic records are not always kept.
|
Animation
This is the next stage after sawing. The sand tray, with its heat source, requires one or two accessories. The first is a pair of snipe-nose pliers; a pair of long tweezers is also useful, and something to smooth and shape the sand (I use a waste veneer). This becomes a good indicator of the sand's heat. Toasting has already been illustrated. The delicacy of shading possible can be seen in the diagrams of the book, a section of fan is being shaded. The method should be to move the section forward; the heap of sand in front shows this. Another photograph shows the result with one quick pass through the sand. The animation of the lighter woods, especially boxwood, is far easier than the darker woods. Darker woods do not adapt as well, and caution should be exercised as charring can happen very easily.
|
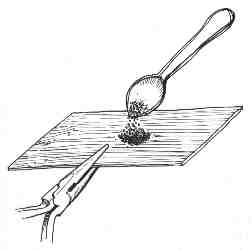 |
Sometimes a shaded area in the middle of a piece is needed. Mark the area, and with a small spoon keep a continuous heap of very hot sand in place. When long curves require regular shading (convex or concave), contour the sand into the shape of the piece; this makes control much easier. Toasting is a fascinating part of the process which has scope for continuous experimentation. There are more techniques to be tried than I have space to set down here. Always keep a small brush available to clean all the sand away; it tends to get everywhere. Finally, if you decide to thicken up all your veneers, which does make sawing work easier, remember to check that your gluing will stand the heat of the sand. It will pay to reduce the heat of the sand and use waste veneers to test what temperature is best.
|